Google Photos is an excellent tool for backing up your iPhone’s camera roll. If you don’t want to upload all of your images on google cloud, here’s how to unsync Google Photos from your iPhone.
There are several methods for backing up your iPhone or iPad’s camera roll. Google, Microsoft, Dropbox, and other apps can automatically generate copies of each photo you take, ensuring that they are safely backed up. Google Photos offers many benefits, and it’s a terrific application for organizing your picture collection. Still, not everyone wants all of their photos and videos automatically uploaded to Google’s servers. So, here’s how you can prevent Google Photos from backing up your data.
How to unsync Google Photos from iPhone in two ways
It’s really easy to unsync Google Photos from your iPhone. This blog will show you two methods to unsync or unlink Google Photos from your iPhone. The methods are given below:
- How to unsync Google Photos from iPhone through the google photo app
- How to unsync Google Photos from iPhone by deleting the app
So, let’s explore the methods. Moreover, this blog will cover lots of other relevant information.
How to unsync Google Photos from iPhone through the Google Photos app
It’s simple to disable backup and sync. Follow the process below to unsync Google Photos from your iPhone through the google photo app.
- Simply open the Google Photos app on your iPhone or iPad.
- Then, touch on the menu symbol (three horizontal bars) in the top-left corner, followed by the Settings icon (the cog).
- Back up, and sync should be at the top of the list. To disable the service, touch it and then the toggle.
That’s all you need to do, but there are several more alternatives you might want to consider before turning off backup entirely. If Google Photos is eating up all of your mobile data, use the toggles further down (highlighted in the far right picture above) to prevent it from uploading photos and/or videos through 3G or 4G.
Suppose you’re running out of space on Google Drive. In that case, you may adjust the Upload size from ‘Original’ to ‘High quality,’ which does not count against your Google storage and allows you to back up all of your images and videos for free, but at a little decreased quality.
Back on the main Settings panel (the center image), you can turn off the Assistant cards that recommend animations and automatically alter photographs and videos.
There’s also the option to block location information from being shared when you email the link to a photo to someone. This prevents them from seeing the location of the photograph. This feature is disabled by default.
How to unsync Google Photos from iPhone by deleting the app
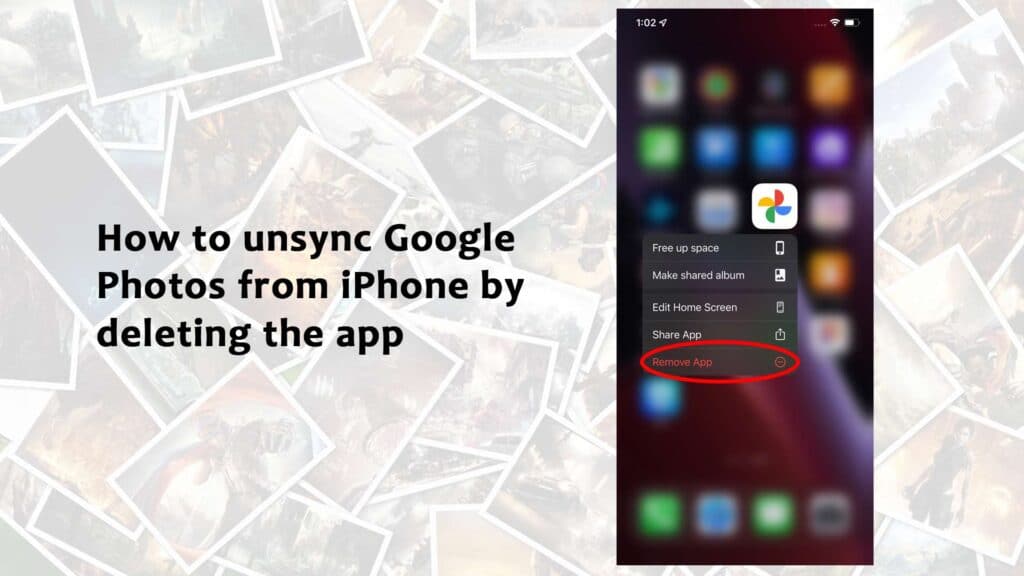
Deleting Google Photos and google drive will help you unsync Google Photos from your iPhone. When you delete Google Photos from your iPhone, your iPhone can not access your Google Photos to take a backup of your images. Sometimes, we see that only deleting Google Photos from your iPhone doesn’t unlink google drive. Thus, Google Photos remain synced with your iPhone. So, you also have to delete google drive along with Google Photos.
To delete Google Photos from your iPhone, follow the step below:
- Tap and hold on for some second on the icon of the google photo on your iPhone home screen
- On the tap on the “Remove app.”
- Then tap on “delete app.”
In the same way, you can delete the google drive from your iPhone.
How to sync Google Photos from iPhone
One of the nicest advantages of Google Photos is that it will automatically backup any photo and video you take with your phone. When you initially install Google Photos on your iPhone, you will be prompted to login in to your Google account. Then you’ll be directed through a setup procedure where you may enable backup and synchronization:
- “Allow access to all images” should be selected.
- Sign in using your Google account, then select “Back up as [your name].”
- Choose a quality level for your photographs.
- Toggle the setting to “Use cellular data when Wi-Fi is unavailable.”
- Select “Confirm.”
If you want to start utilizing Google Photos as a backup, that’s all there is to it. If you overlooked or skipped the sign-in stage while configuring Google Photos, don’t panic; simply follow these simple procedures to enable backup:
- Launch Google Photos.
- Tap your account profile photo in the top-right corner.
- Go to Photos > Settings > Backup & Sync.
- Toggle the “Back up & sync” option on or off.
- Depending on the size of your photo collection, it may take a few hours to upload everything, but your photographs should start uploading immediately.
How to Only Upload Specific Photos to Google Photos
Perhaps you do not wish to upload your complete library to Google Photos. You don’t even need the app if that’s the case. Select images from Safari on your phone can be uploaded. Here’s how it works:
- Navigate to photos.google.com in Safari.
- Sign in with your Google account.
- Tap the Upload icon > iPhone > Photo Library at the top.
- Tap Add after selecting the images you wish to upload.
What is the difference between unsync and unlink Google Photos from iPhone?
Unsyncing and unlinking are similar approaches. When you unsync the Google Photos from your iPhone, it will be automatically unlinked. Moreover, when you unlink the Google Photos from your iPhone, it will be automatically unsynced.
How to unsync Google Photos from iCloud
The process for unsyncing Google Photos from iCloud and iPhone is the same. When you delete the google photo app or unsync the google photo from your iPhone, Google Photos will be automatically unsynced from iCloud. To unsync Google Photos from iCloud, follow the step below:
- Launch the Google Photos app on your iPhone or iPad.
- Then, in the top-left corner, tap on the menu symbol followed by the Settings icon.
- Back up, and sync should be at the top of the list.
- To disable the service, tap it and then the toggle.
How to delete all Google Photos content on your iPhone
This step may be quicker to complete in a computer browser, but it can also be achieved with an iPhone browser:
- Launch a web browser (Safari, Chrome, etc.)
- Navigate to photos.google.com.
- Select all of the content in Google Photos that you do not wish to preserve.
- In the top right-hand corner of the screen, click the trash bin.
- In the upper left-hand corner, click the menu symbol.
- Go to the Trash
- Click the Empty Trash button.
Is it possible to remove my Google Photos account?
In a nutshell, no. There is no way to deactivate or disable the Photos feature solely in your Google account. Suppose you no longer want to use Google Photos. In that case, the best solution is to erase all material from Google Photos by following the procedures outlined above. Simply keep it unfilled and act as if it never existed.
How to upload photos to Google Photos from iPhone
Following the download and installation of the app on your iPhone, you will be requested to complete the following:
Log in with your Google Account. You may log in with the same credentials if you’ve used any other Google products, such as Gmail. Just be sure to use the account to which you want your photo collection to be linked.
Activate Back up & Sync. This uploads your complete photo collection and automatically uploads new photos as they are taken.
Set the level of quality. The sole restriction on Google’s “unlimited” storage is that you may only upload compressed, high-quality photographs. If you submit photos to Google in their original resolution, they will count against your Google Drive storage limit.
Tell it when to take a step back. You may authorize Google Photographs to upload photos via a cellular connection using your data plan, or you can instruct it to wait until you reconnect to Wi-Fi.
How to share photos and albums in Google Photos
As previously said, sharing with Google Photos couldn’t be simpler.
To share a photo:
- Launch Google Photos.
- Tap the Share button once you’ve chosen the photo or video.
- Enter a contact’s name, phone number, or email address.
To share an album:
- Launch Google Photos.
- Select Albums.
- Choose the album that you wish to share.
- Select the Share option.
- Enter a contact’s name, phone number, or email address.