You have an excessive number of photo albums on your iPhone and wish to get rid of them. Getting rid of iPhone albums is a wonderful method to free up some storage space and declutter your phone. I’ll teach you how to remove albums on your iPhone in this post.
Why should I delete albums on my iPhone?
Some third-party applications build picture albums of the photographs you publish within the app on your iPhone. This is particularly prevalent on social media applications such as Instagram and Twitter.
Because photographs are big files, the albums generated by these applications might take up a lot of storage space. The more photographs you upload to these applications, the bigger the albums get, and the less storage space you have on your iPhone.
Deleting albums is a wonderful method to clean up your Photos library and free up some storage space!
Install the cleaner app for iPhone for free to delete ablums and duplicate photos on your iPhone. For more details visit their webpage
How to delete albums on iPhone
Deleting albums including photo albums or video albums is really easy on iPhone. You delete iPhone using the basic function or using an app. Using an app is always an easier process while the default function is a bit complex. There are lots of apps to delete albums on the iPhone.
How to delete albums on iPhone using the iPhone cleaner app
Install the cleaner app on your iPhone for free. Open the Cleaner for the iPhone application. Select Photos or album. Then choose from the following categories to find identical photos: Live, Bursts, Blurred, Similar Photos, and Screenshots. Then press Delete Selected after selecting all or just those you wish to delete.
How to delete albums on iPhone using the default function
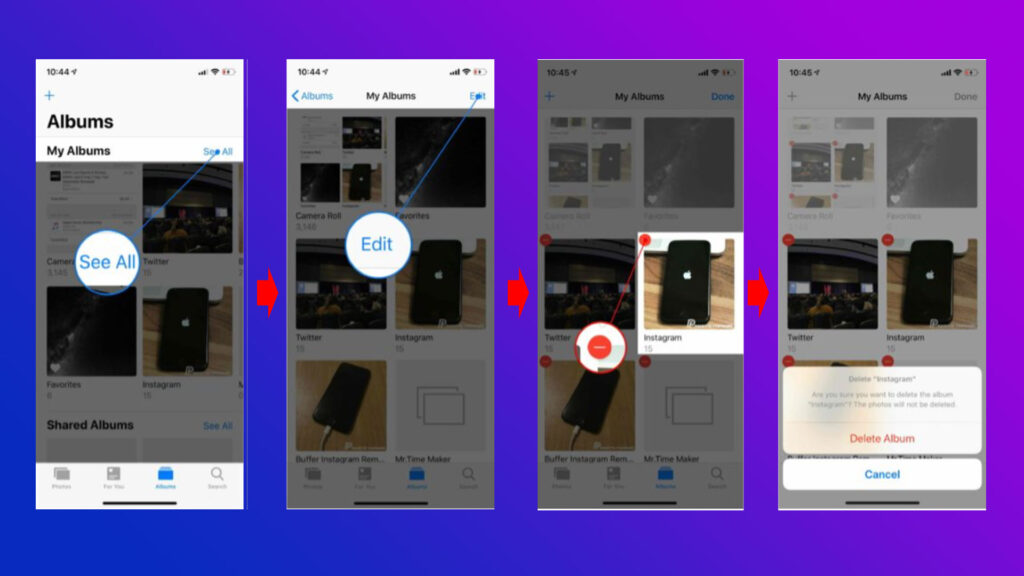
Open Photos and touch the Albums option at the bottom of the screen to remove albums on your iPhone. Next to My Albums, tap the Sell All button. Then, in the top right-hand corner of the screen, hit Edit.
Then, in the upper left-hand corner of the album, press the red minus button. Finally, hit Delete Album to remove the picture album from your iPhone. Tap Done in the top right-hand corner of the screen after you’re finished removing iPhone albums.
Why can’t I delete some albums?
You can’t erase some photo albums on your iPhone. You won’t be able to remove the following items:
- The Camera Roll on your iPhone.
- Albums that your iPhone creates automatically, such as your People & Places albums.
- albums of various media types (Videos, panoramas, etc.).
- iTunes was used to sync albums from your PC.
You may erase iPhone albums that were synced from your computer, but you’ll have to do so using iTunes.
How to delete iPhone albums synced from iTunes
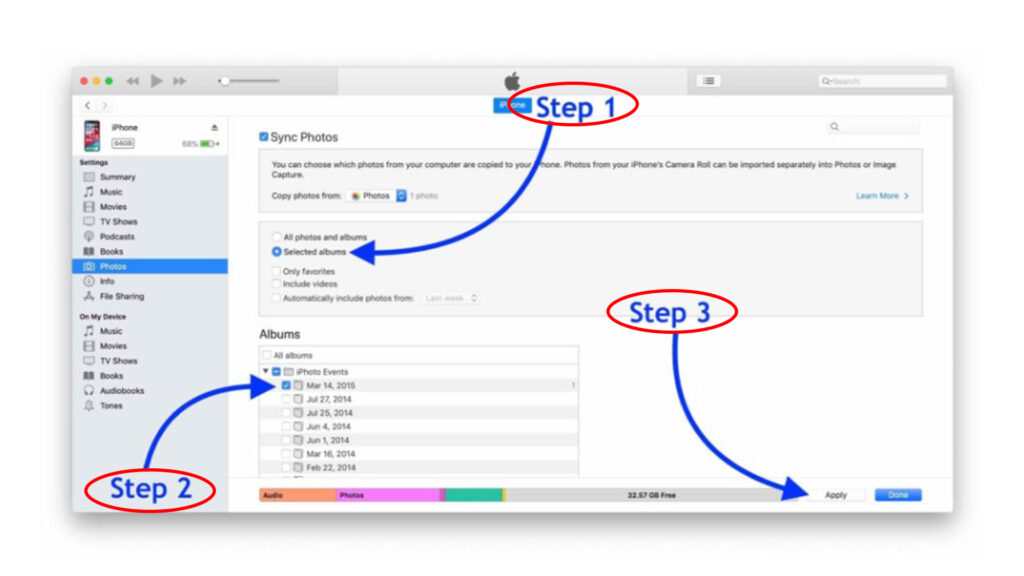
Using a Lightning cable, connect your iPhone to your computer and launch iTunes. Then, at the upper left-hand corner of iTunes, click the iPhone symbol, then Photos.
Select the circle next to Selected Albums, then select the albums you wish to listen to on your iPhone. Any albums you choose not to keep will be removed from your iPhone!
When you’ve done selecting the albums you wish to sync to your iPhone, go to the bottom right-hand corner of the screen and hit Apply. This will allow you to sync your iPhone with iTunes. Click Done in the bottom right-hand corner of the screen when your iPhone has completed syncing.
Albums, farewell!
You’ve cleaned up some space on your iPhone by deleting some of your iPhone albums. Share this post on social media to show your friends and relatives how to erase albums from their iPhones. Leave any more questions regarding your iPhone in the comments area below.