You’ve undoubtedly seen the “Storage Almost Full” pop-up if you’ve had an iPhone for a long. You can’t snap any nice photographs of your pet anymore, and you can’t download any new app. While Apple doesn’t tell you how to free up space on your iPhone, studies show that when you have less than 500 MB of free space, it starts to slow down.
In this article, we will cover everything related to free up space on iPhone. We will also demonstrate steps on:
- How to free up space on iPhone
- How to clear storage on iPhone
- How to free up storage on iPhone
- How to delete other storage on iPhone
- How to delete duplicate photos on iPhone
- How to delete duplicate contacts on iPhone
- How to clear cache on iPhone
- How to clear cookies on iPhone
- How to clear ram on iPhone
- How to increase iPhone storage
Execute all the above processes for free using the Cleaner App for iPhone
Install the app for free
How To Free Up Space on iPhone
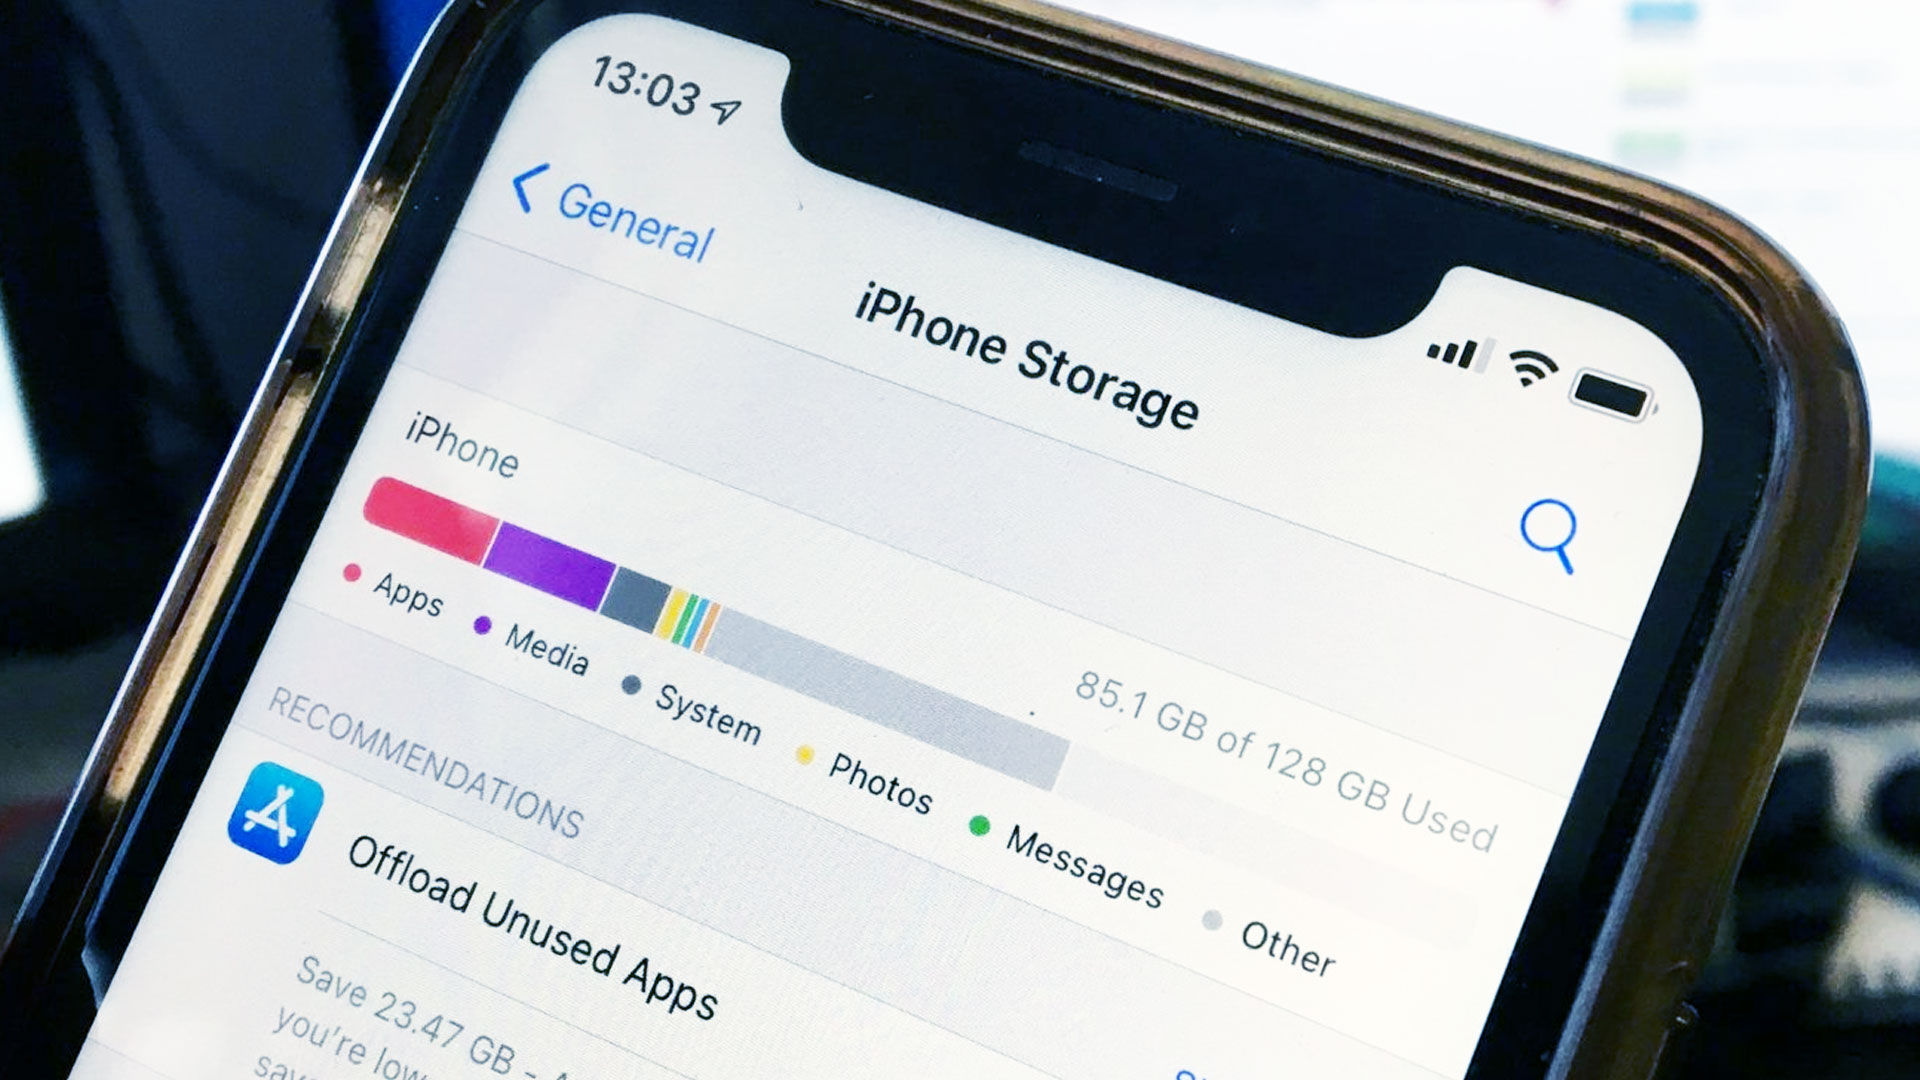
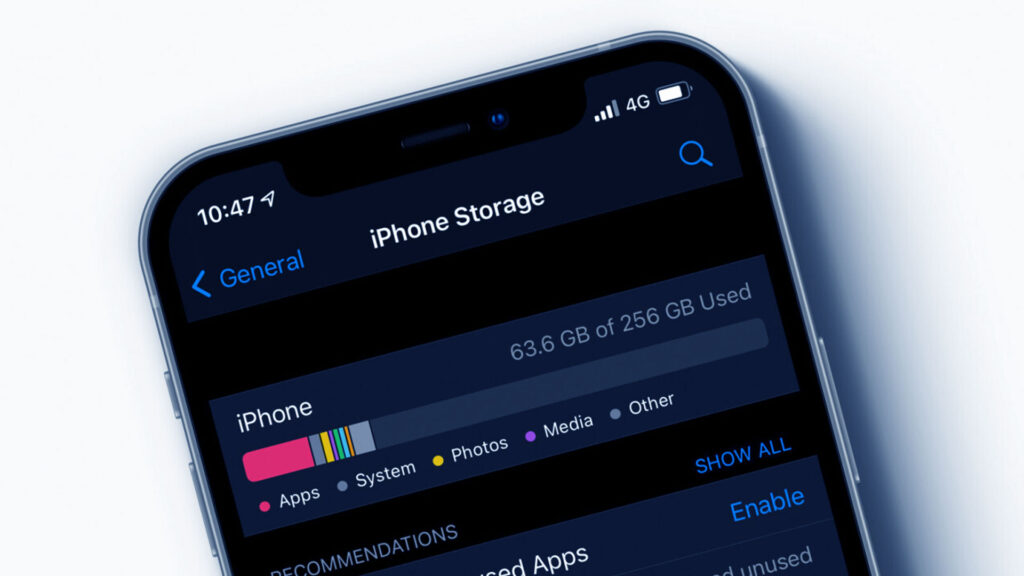
Recommendations should be enabled. Check to check if Recommendations are enabled in the iPhone Storage menu, and if so, enable them. If you want to free up space on your iPhone, go below the iPhone Storage bar for storage-saving recommendations from Apple. Depending on how you use the site, the recommendations you see will change. To enable the suggested option, simply click Enable.
Delete any big or inactive app. Select an app from the list at the bottom of the iPhone Storage screen, then press Delete App to delete it.
You may scroll down while still on the iPhone Storage screen to get a list of all the apps on your phone. The list is ordered by size, with the biggest apps at the top. The apps also give information about when you last used them. You may remove any of the apps by right-clicking on them. An app can also be removed from the Home screen. This is done by tapping and holding an app you wish to remove until it jiggles (probably out of fear of being deleted). On the confirmation pop-up, tap the “X” in the top left corner of the app, then click Delete.
Offloading apps to free up space on iPhone
Large apps should be offloaded. To unload an app, choose it from the iPhone Storage screen and then select Offload App from the drop-down menu.
Offloading apps allows you to shrink the size of a program without losing any documents or data.
Offloading an app does not remove it from your Home screen. However, the app now has a cloud icon to the left of the name, with a downward-pointing arrow. By touching on the offloaded app, you may reinstall it.
You can also automatically offload unused apps. Just follow the steps. Go to Settings > iTunes & App Store > Offload Unused Apps. Apps will automatically be offloaded when the slider is green.
Deleting unnecessary music to free up space on iPhone
Delete any music you’ve downloaded. Go to iPhone Storage > Music and touch Edit to remove your music. Press the red minus sign next to the “All Music” option to remove all of your songs, then tap the delete button that appears. Individual artists can also be deleted by tapping the red minus sign and then deleting.
Deleting old podcasts to free up space on iPhone
Delete any old podcasts you have. Go to iPhone Storage > Episodes and select Edit at the bottom of the screen to remove podcasts. Then, next to a podcast, click the red minus symbol, and then the delete button that appears. When you delete a podcast, all of its episodes are deleted as well.
You can also stop the Podcast app from automatically downloading new episodes. Just follow this procedure. Go to Settings > Podcasts. Under the Episode Downloads screen, check the Off option.
You may also activate the Delete Played Episodes option to ensure that your podcasts do not take up too much space in the future. After you’ve done listening to a podcast, this will remove it from your phone.
Saving images on the cloud to free up space on iPhone
In the cloud, you may save your photographs. Go to Settings > Photos > iCloud Photos to store your photos to iCloud. Then, next to iCloud Photos, check sure the slider is green.
Your photographs will be automatically uploaded to Apple’s cloud storage — and off your phone – after you allow this. Don’t be concerned. You may still go at your photographs, edit them, and share them at any time. Check out our earlier post for instructions on how to transfer your photo to your Mac.
Turn off the photo streaming feature. Go to Settings > Photos and toggle off the Upload to My Photo Stream option to disable Photo Stream. When it’s greyed out, you’ll know it’s off.
Photo Stream collects the latest 1,000 photographs from all of your devices in one stream over the previous 30 days. It does not affect your iCloud storage, but it does take up space on your phone. However, since they are merely duplicates of photographs you already have, you should disable this function.
Only HDR-quality photographs should be saved. You may conserve space by turning off the Keep Normal Photo option in Settings > Camera.
When you snap a picture with an iPhone, it stores two versions: one with HDR (High Dynamic Range) and one with a standard exposure. HDR is a technique that combines three images with various exposures to create a single image with the greatest color and detail.
When you activate the Keep Regular Photo option, both a normal and an HDR version of the photo will be stored to your phone. When you turn it off, your photographs take up half as much space, which is ideal if you need to clear up space on your iPhone.
Deleting unnecessary messages to free up space on iPhone
Delete any material that has been saved in Messages. Go to Settings > General > iPhone Storage > Messages to manually remove content in Messages.
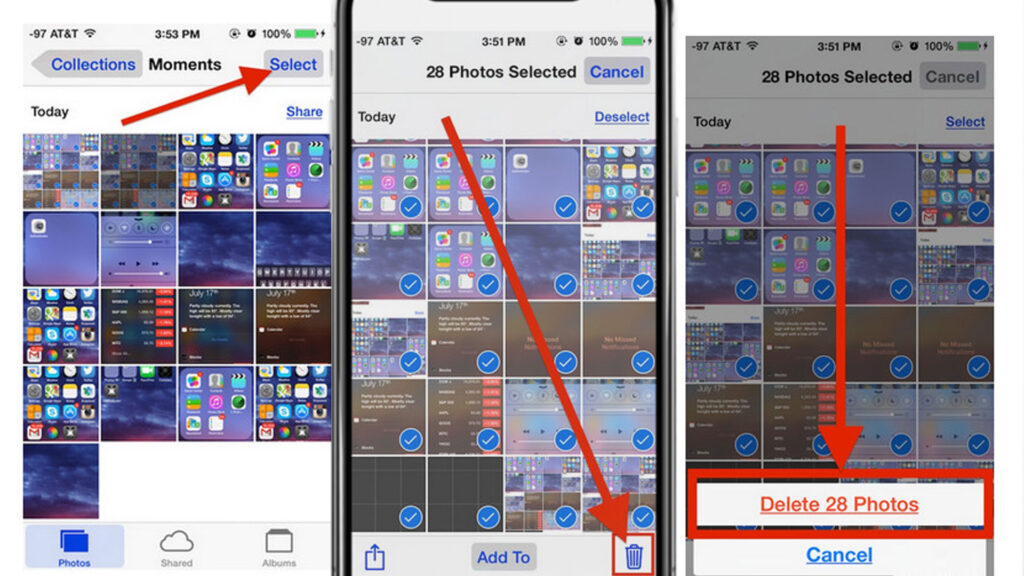
Top Conversation, Photos, Videos, GIFs and Stickers, and Other are the five categories in which the material is organized. The overall size of all the files is also displayed in each of the categories. After selecting a category, click Edit. Then choose the item or things you wish to get rid of. Finally, in the top right corner of your screen, press the Trash icon. Every image, video, GIF, or sticker you use to personalize your messages takes up a little amount of space. Even if you only get one, it takes up a little amount of space on your iPhone.
Delete mails on an automatic basis. Go to Settings > Messages to set your iPhone to erase messages automatically. Keep Messages under Message History, then pick 30 days or 1 year from the drop-down menu. On the confirmation dialog box, select Delete.
Messages’ message history is set to preserve messages indefinitely by default. However, unless you have legal or other compelling reasons to do so, you don’t need to keep all of them.
You may also have audio messages deleted automatically. Click Expire under Settings > Messages > Audio Messages. Instead of the default choice of Never, select After 2 Minutes.
How to delete other storage on iPhone
The “Other” area is a lot less simple than the apps, media, pictures, and messages categories. In the iPhone Storage menu, you won’t be able to see what things make up this category.
Clear the cache in your browser. Go to Settings > Safari > Advanced > Website Data to delete Safari cache files. You have the option of deleting specific website data or deleting all website data.
For online pages you visit frequently, browsers like Safari and Chrome keep data in their caches. This information is kept so that the material does not have to be loaded every time you visit the site. Your browser will load pages faster as a result of this, but the data will take up storage space. The same is true for Apple TV or Apple Music, music or video downloads. The downloaded material is categorized as Media on iOS, whereas the cached files are categorized as Other.
Simply click the ellipsis in the bottom navigation bar to delete your Google Chrome browser cache. Clear Browsing Data after tapping History.
Delete any previous voice memos. By accessing the Voice Memos app and choosing Edit, you may erase a voice memo. Then choose a recording to delete and press Delete.
Students can use Voice Memos to record a lecture or to record interviews and meetings in the workplace. However, they, like all other files, may take up a lot of storage space. Keep in mind that one hour of recorded audio typically consumes 30 MB of storage.
Delete apps’ offline content. Simply select the hamburger menu in the upper left corner of Google Maps to remove offline maps (the one with three lines next to the Search Box). Select the one you want to delete from Offline Maps.
How to clear storage on iPhone
Let’s explore How to clear storage on iPhone.
Stop archiving texts indefinitely.
Your iPhone saves all of the text texts you send and receive by default… indefinitely. This is useful if you need to search up a 15-month-old chat, but it’s not so useful if you need that storage space back. Open the Settings app and hit Messages to stop your phone from storing texts indefinitely. Keep Messages by scrolling down until you locate Message History. Change the duration of Forever to 30 days or a year. If you want to remove earlier messages, a pop-up will appear; press Delete to proceed.
Don’t save the same shot twice.
If you frequently use your iPhone’s HDR mode or Instagram, you’ve undoubtedly noticed that your phone stores two photos: one in HDR and one in regular mode (or, in the case of Instagram, the filtered, cropped Instagram version and the normal version).
Open the Settings app and click to Photographs & Camera to disable HDR photos from being saved twice. Untick the toggle next to Keep Normal Photo at the bottom of the page. If you have an iPhone 7 Plus, you’ll notice a similar Portrait mode toggle that you may turn off.
To stop Instagram photographs from being saved twice, launch the app, go to your profile tab, and then hit the Settings (tool) button in the upper right corner. Uncheck the box next to Save Original Photos in the Settings menu.
Put an end to the Photo Stream
Because the images in your Photo Stream are uploaded to your smartphone at a “device-optimized quality,” according to Apple, they take up less space than original photos. These images are presumably duplicates of photos you already have on your smartphone, so you don’t need them.
To disable Photo Stream, go to the Settings app, click to Photos & Camera, and disable Upload to My Photo Stream. The images in your Photo Stream will be removed from your iPhone, but they will stay on any other devices where Photo Stream is enabled (such as your iPad or PC). They’ll also stay on your iCloud account for 30 days after you’ve uploaded them.
Clear your browser cache
If you often use Safari, your iPhone may be keeping browser history and data that you don’t require. Open the Settings app and hit Safari to erase Safari’s browser cache. Click Clear History and Website Data at the bottom of the page.
Open the Chrome app and press the triple-dot button in the upper right corner if you’re using Chrome instead of Safari. After that, tap History and then Clear Browsing Data at the bottom of the screen.
Delete the songs you’ve downloaded
Those playlists and CDs you downloaded to listen to while riding the metro may quickly accumulate. If you use Apple Music, it’s simple to locate and remove your downloaded music. Select Apple Music from the list under Settings > General > Storage & iCloud Usage > Manage Storage. You can swipe to delete individual tracks, or swipe to erase all songs at the top.
Spotify makes it a little more difficult to locate your downloaded files. To view by Album or Playlist, launch the app, hit Your Library, and then select Album or Playlist. Swipe down to display the Filter option, then select the Downloads filter to only see albums or playlists that you have downloaded. Then open any of the albums or playlists mentioned and touch to turn off the Downloaded toggle button.
Delete any podcasts you’ve downloaded
You may have a number of podcasts downloaded to your iPhone, similar to music. Unlike music, it’s unlikely that you’ll listen to a podcast repeatedly. It’s simple to remove your downloads if you use the default Podcasts app. Back in Settings, go to General > Storage & iCloud Usage > Manage Storage, and choose Podcasts. Because you can’t delete them all at once, you’ll have to go through the list one by one, swiping to delete the podcasts for each program.
Remove your reading list from your pc
Safari’s offline reading list can take up a lot of space by storing online pages for you to read when you don’t have access to the internet. To remove Safari’s offline reading list, click to General > Storage & iCloud Usage in the Settings app. Tap Manage Storage > Safari under Storage. To delete the cache, swipe left above the words Offline Reading List and press Delete. Individual items will not be removed from your reading list as a result of this: To do so, open Safari and navigate to your Reading List, then swipe left over the things you wish to delete.
How to free up storage on iPhone
Clearing up space on your iPhone doesn’t have to be as difficult as it may appear. Here are the four fundamental ways to free up space on your iPhone:
- Organize your photo collection.
- Upload your images and videos to the cloud.
- Clear app caches and uninstall any apps that are no longer in use.
- Clear up the rest of your iPhone’s storage.
Note: The steps or the process addressing: how to free up space on iPhone, how to clear storage on iPhone, how to free up storage on iPhone, how to clear space on iPhone, how to clear up space on iPhone and how to clear up storage on iPhone are more or less similar to each other.
How to delete duplicate photos on iPhone
While manually scanning your collection for duplicate and similar pictures is one option, it isn’t the only one. We’ll show you how to manually eliminate duplicates, purge similar pictures in Google Photos and iCloud, and — the quickest method — erase duplicates using the Cleaner app for iPhone.
How to remove duplicate iPhone photos using Cleaner app for iPhone
Cleaner app for iPhone not only detects identical photos on your iPhone, but also similar images, fuzzy photos, and even screenshots. Here’s How to remove duplicate iPhone photos using Cleaner app for iPhone:
- Cleaner app for iPhone is available for download from the App Store.
- Allow the app to scan your device after you’ve opened it.
- Select a category, such as Duplicates, from the drop-down menu.
- Choose a collection of images to evaluate, then pick which photos you wish to remove individually.
- After you’ve finished picking, go to the bottom of the screen and press Delete Duplicates.
- To confirm, tap Delete.
How to delete duplicate contacts on iPhone
We’ll focus on how to manually remove the overlapping contact information from your iPhone or iPad in this post. This entails locating and eradicating duplicate contact information. So, let’s have a look at the actions that are required.
- From your iPhone’s home screen, open the “Phone” app and go to the “Contacts” area.
- Find the duplicate contacts in your list by scrolling through your contacts. Any duplicate contact may be selected by tapping on it.
- To update the contact information, go to the top-right corner of the screen and touch “Edit.”
- You may erase all of the information saved here if you scroll all the way down. Simply select “Delete Contact” from the drop-down menu.
- You’ll be asked to confirm your action now. To finalize deletion, choose “Delete Contact” one again.
That’s how you remove duplicate contacts from your iPhone manually. Although this post primarily focuses on the iPhone, the same technique may be used to erase duplicate contacts from your iPad and iPod touch as well.
Merging duplicate contacts is a viable alternative to removing them. That’s correct, if you have contacts saved in several places on your iPhone, such as Google, iCloud, Outlook, and so on, you may wish to connect or combine them to eliminate duplicate information.
For most of you, manually removing duplicate contacts will be a pain, especially if you have a lot of them on your iPhone. You may also use third-party apps like Contact Cleanup or Cleaner Pro, which are available on the App Store, to locate and combine all of the duplicate contacts on your iPhone (we’re not endorsing such apps; we’re merely pointing you that they exist for this reason).
Do you have a Mac and use iCloud to sync your contacts throughout all of your Apple devices? If that’s the case, you’ll be glad to learn that finding duplicate contacts and merging them within the Contacts app on macOS is very quick and uncomplicated, making it perhaps the easiest solution for those who are deeply embedded within the Apple ecosystem with a Mac and iPhone.
Have you successfully removed all duplicate contacts from your iPhone or iPad? Do you use Apple’s iCloud to sync your contacts, or do you utilize third-party services like Google or Outlook to manage your contacts? Did you erase duplicate contacts from your iPhone or iPad address book using a different method? Please share your ideas, experiences, and opinions in the comments area below.
What happens when you clear the cache on iPhone?
Clearing your cache clears the website data saved locally on your phone, preventing you from having to download it each time you visit. The data in your cache accumulates over time and, if it becomes too large, it might slow things down. (When I looked, my phone had around 150 MB of data saved in Chrome.) Clearing that data offers websites a new start, which may help them load faster and correct some problems. Clearing your cache, however, also logs you out of pages, so be prepared to sign in again.
How to clear cache on iPhone
There might be a variety of reasons why your iPhone is running slower than normal. However, if you see it moving slowly from app to app and struggling to open browser tabs, it’s definitely time to clean the cache on your phone. You can accomplish it in a few simple steps, and the method may save you money on an iPhone update (unless you’re really excited about the iPhone 13). You may also adjust the storage on your iPhone to help it catch up.
Visiting a website usually necessitates your phone downloading information such as images, ads, and other data. Most internet browsers will save part of the material in a cache to make it easier to access. Consider keeping a 24-pack of beverages in your refrigerator so you don’t have to go to the shop every time you want a drink. It’s practical in tiny doses.
When your browser’s cache becomes obsolete, the data being obtained no longer matches the data actually being utilized on the page, things become less convenient. What’s the end result? Website loading times are slower, and the formatting is messed up. This is why deleting your cache might be beneficial: It offers websites a new start in your browser and frees up storage space.
It’s important to keep in mind that deleting your cache will sign you out of any sites you’re presently logged into. Even so, it’s usually worth the minor discomfort to keep things going forward fast.
Depending on the browser you use, here are step-by-step instructions for clearing your cache on your iPhone.
How to clear cache on iPhone in Safari
On iPhones, Safari is the default browser, and you can clear your cache in just a few simple steps. It’s worth noting that, starting with iOS 11, this procedure will effect all of your iCloud-connected devices. As a result, the caches on all of your devices will be wiped, and you’ll have to login into everything again the next time you use it. Here’s what you should do:
1. On your iPhone, open the Settings app.
2. From the list of apps, choose Safari.
3. Select Clear History and Website Data from the drop-down menu.
4. In the popup window, confirm your choices.
Then you’re ready to go!
How to clear cache on iPhone in Chrome
Chrome is yet another popular iPhone browser. There are a few more steps to deleting your Chrome cache, and you’ll have to do everything through the Chrome browser itself. Here’s how to do it.
1. Launch the Chrome browser.
2. To access more choices, choose the three dots in the lower right corner.
3. Select Settings from the drop-down menu.
4. In the next menu, choose Privacy.
5. Finally, click Clear Browsing Data to get a final menu.
6. At the top of the menu, select the desired time period (anywhere from Last Hour to All Time).
7. Check that Cookies, Site Data, and Cached Images and Files are all checked. Finally, at the bottom of the screen, select Clear Browsing Data.
How to clear cache on iPhone in Firefox
Don’t worry if you’re a Firefox user. It’s quite simple to clear the cache on your iPhone. Simply follow the steps below.
1. To access more choices, click the hamburger menu in the bottom right corner.
2. In the next menu, choose Privacy.
3. At the bottom of the menu, select Settings.
4. Go to Data Management and choose it.
5. You may clear data for particular sites by selecting Website Data, or you can erase data from all chosen fields by selecting Clear Private Data at the bottom of the screen.
How to clear cookies on iPhone
Websites save tiny files on your phone or computer called cookies to help them remember information about you and your visit. They can tweak and customise your web experience this way. Cookies may be used by your bank to remember your login email address and how the web page is displayed. Cookies may be used by a merchant to remember what’s in your shopping cart.
Cookies, on the other hand, can be an issue at times. On an iPhone, you might need to delete your cookies to fix an issue with the way your browser is acting or conserve storage space. Some privacy advocates advise for completely disabling cookies so that websites cannot gather personal information about you.
While deleting cookies on a regular basis might be useful, we recommend having them enabled because disabling them results in an unpleasant and unsatisfactory online experience. See our article “How to allow cookies on an iPhone to assist speed your online surfing” if you’ve disabled cookies and later chosen to set them back on.
How to Clear Cookies and Safari Browsing History on iPhone
When it comes to removing cookies from the iPhone’s default Safari web browser, you have a few alternatives. You may remove both your browsing history and cookies at once, just the cookies, or only the cookies for a specific website.
- To erase all website data, including browser history, from Safari on the iPhone, follow these steps:
- Scroll down in the iPhone Settings app and pick Safari.
- Clear History and Website Data is the option to choose.
- Choose Clear History and Data when prompted to confirm your choice to erase the record of websites you visited as well as the cookies saved for the Safari browser.
- When you’re finished, close the Settings app.
How to Delete Cookies While Saving Safari Browser History
To erase cookies from an iPhone, you don’t need to wipe the browser history. You may also choose to remove just cookies or cookies from a certain website. You’ll have to log in to websites again after deleting all cookies. Delete the data for a certain website if you’re having issues with it.
- Select Safari from the iPhone Settings app.
- Choose Advanced.
- Data from the website should be selected. The Safari browser app provides a list of all websites that have cookies saved. From this screen, you may erase all cookies or delete particular cookies.
- Swipe left on any website in the list and select Delete to delete individual cookies from the Website Data menu.
- Select Remove All Website Data and agree by pressing Remove Now to remove all of the websites in the list.
How to Clear Cookies in the Chrome App
The Google Chrome browser app for iPhone is an alternative to the iPhone’s default Safari browser.
Here’s how to get rid of Chrome’s cookies:
- Tap the… menu symbol in the Chrome app (the three horizontal dots located in the lower-right corner of the screen).
- Select Privacy from the drop-down menu.
- Clear Browsing Data is the option to choose.
- Clear Browsing Data after selecting Cookies, Site Data.
- Select Clear Browsing Data to indicate that you wish to clear the Chrome app’s browsing data.
How to clear ram on iPhone
Clearing RAM on earlier iPhones is faster because it does not require AssistiveTouch. Let’s take a look at how the iPhone 8 and 8 Plus, iPhone 7 and 7 Plus, iPhone SE, and iPhone 6s, 6s Plus, 6, and 6 Plus go through the procedure. Here’s what you should do:
- Hold down the Power button until the slide to power off option appears.
- Hold down the Home button for around 5 seconds after releasing the Power button.
Your screen will go black after a few seconds, indicating that you have successfully emptied RAM on your iPhone. Enter your password if prompted.
How to increase iPhone storage
With all of the images, movies, apps, and music we save on our phones, filling up 16 GB is a breeze.
Delete or splurge are the two most common ways individuals deal with storage shortages. Having to delete all those data on a regular basis is a hassle, and spending $100 for an extra 48 GB is a huge scam.
Unfortunately, unlike some other cellphones, the iPhone does not offer expandable storage. However, there are ways to increase the capacity on your iPhone without breaking the bank or losing everything.
Insert a flash drive into the iPhone
Although you can’t extend the internal capacity on your iPhone, you can expand its external storage. Flash storage works in the same way as an external hard drive does for your PC, except that this one goes with your iPhone everywhere it goes.
The $60 Leef iBridge is a flash storage device that plugs straight into your Lightning connector and quickly expands your phone’s capacity. The iBridge bends over your iPhone in a J-shape, but it’s a lot of money for just additional 16 GB of storage. There are lots of other alternatives, such as the SanDisk iExpand, which has 32 GB of storage for $42.
The Space Pack from Mophie is a battery and 32 GB external storage container in one. It’ll set you back $149, but you were probably going to buy a case anyway.
With an SD card, you may add as much storage as you like to the $38 TFZ i-Flash Drive. (If you don’t have any left over from your previous digital camera, a 128 GB micro SD card costs approximately $60 on Amazon.)
Keep a wireless hard drive in your pocket
There are wireless storage alternatives if you don’t want to deal with cables or have anything plugged into your phone all the time.
Your iPhone may connect to a wireless storage device in your pocket or handbag by connecting them to the same Wi-Fi network. You may program your phone to automatically save files to the wireless drive rather than saving them locally using a companion app.
A good example is the RAVPower Filehub ($36). Any flash drive or SD card may be inserted into it. It also serves as an external battery when plugged into your phone. The SanDisk Connect has 32 GB of built-in storage and costs $47. (no need for an SD card).
Keep your files at home
You may create your own personal cloud if you require a lot of extra capacity. The Western Digital MyCloud network storage device costs $159 and can store up to 4 terabytes (4,000 GB) of data.
You retain the MyCloud at home, but you can access the files using the accompanying app from anywhere. You can also use MyCloud to back up all of your files from your home PC or Mac as an extra benefit.
Use the cloud
Why keep your files on your own hard disk when you can keep them on someone else’s? To manage your data on the cloud, you may use DropBox, Amazon Cloud Drive, Google Drive, Microsoft (MSFT) OneDrive, or Apple (AAPL) iCloud. You may have to pay a monthly membership charge depending on how much you store.
Google (GOOGL) Photos will provide you with free, unlimited photo storage, but at a reduced file size. You can also upload your complete music library to the cloud and stream it to your phone using Google Play Music Manager and Amazon (AMZN) Cloud Drive.
Clean your phone
You may clean away unwanted files that collect on your phone with apps like Cleaner app for iPhone. However, you’ll only be able to free up a few gigabytes at most.